I joined ClickUp almost two years ago now and it’s quickly become the star of my tech stack. It has streamlined absolutely every process I have and I’m not kidding when I say it literally runs my entire life.
From Business to Personal, Content Planning to Meal Planning, it does it all. So, today I’m going to walk you through how to get started with ClickUp so you can set up your own life management system.
ClickUp Hierarchy
Workspace
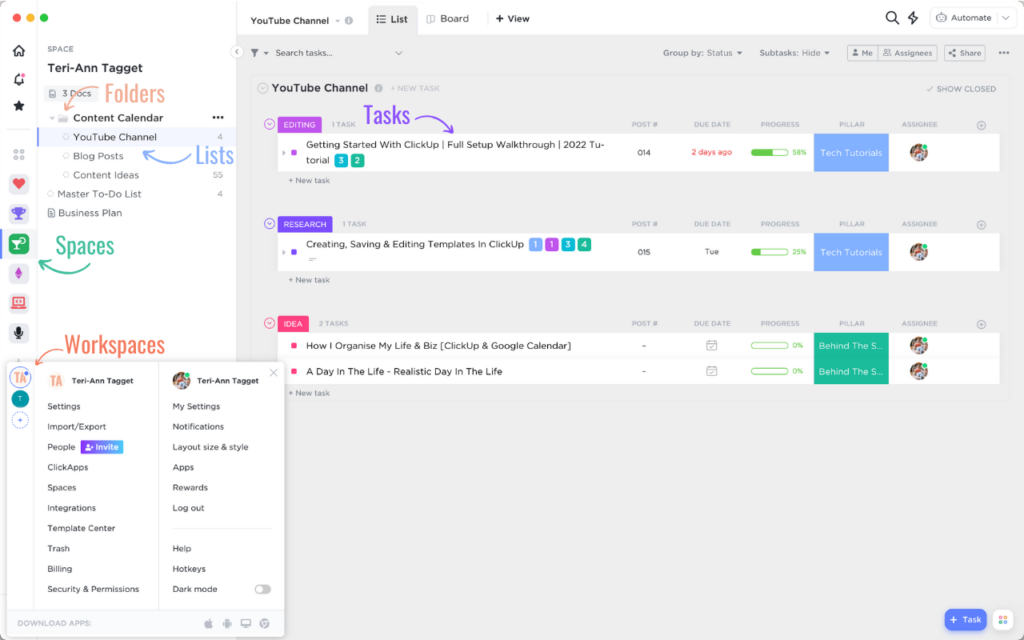
These are the top level of the hierarchy and represent everyone and everything within a company or business. A really important point to make here is that workspaces are completely separate from each other, so it’s usually best practice to keep all your work for each business under one workspace.
Spaces
These can be used to separate the functions or departments within a business for example Sales, Marketing, Finance, HR etc. You can then add members to the relevant spaces. Each space has its own settings and can be set up completely different from other spaces.
Folders
These are used to organise Lists of Tasks or Docs. These are not an essential part of the hierarchy but can be used to group lists. Helpful for things such as content lists or for launches.
Lists & Views
Lists are containers for your tasks. This is where you are able to organise your work by status, due dates, and priority as well as include other custom information. You can also add different list views which provide an alternative way of viewing your lists. There are many list options including a standard list, board or kanban view, calendar, timeline, gant etc. You can also add multiple of the same view type but adjust the filters to sort tasks by different information.
Tasks & Docs
Tasks are the most important part of the ClickUp hierarchy. They are the action items required to be completed within each list, space, and workspace. Within a task you have multiple features to assist you in achieving the goal of the task including a description box, custom information fields, sub-tasks, checklists, and chat with the option to tag or assign a comment to someone, really handy if you need to follow up on a task, you can also add documents and images to the task.

Navigation Overview
Home Screen
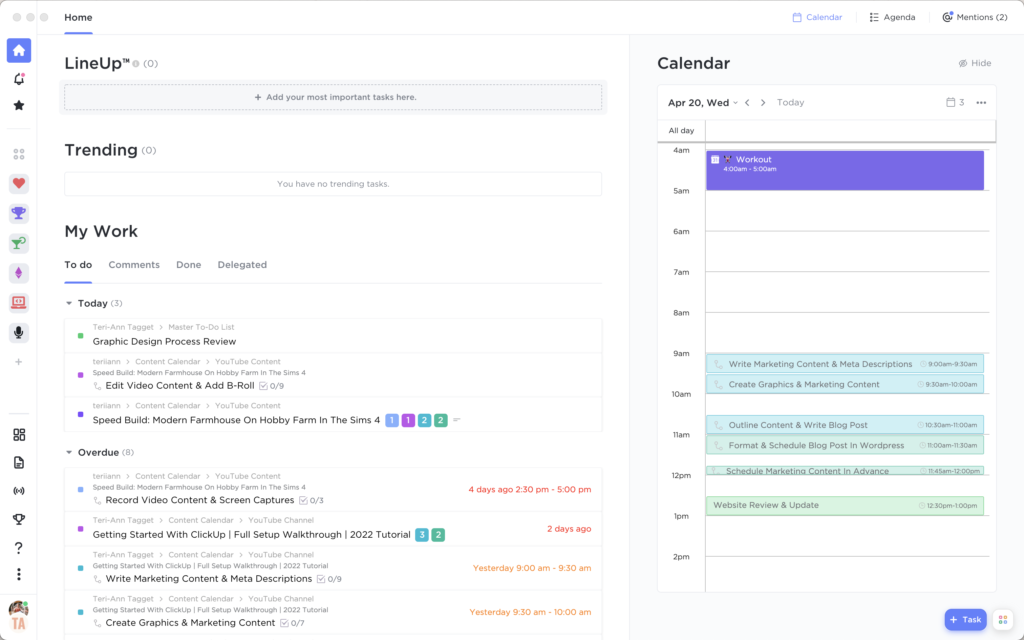
This was the feature that truly sold me on making the switch to ClickUp. The home screen or dashboard is an overview of everything you have due each day with two main sections: My Work & Calendar.
My Work is a running list of items you have due that day. You are also able to see what is overdue and what is coming up. You can also drag these items up into what’s called ClickUps LineUp™ which follows the productivity principal of choosing 1-3 main tasks for that day to focus on.
Calendar has two great functions, the first is that it can sync directly with your Google or Outlook calendar and will show you anything you have there, this is great for planning your day around certain meetings or calls you might have booked. The second is that you can drag the tasks from My Work directly onto the calendar into a time slot of your choosing.
These two features together make planning out your day SO FREAKIN’ SIMPLE!

Dashboard
Now this isn’t a feature I use currently but if you have a team or maybe if you’re in the process of a launch then this could be a really handy feature.
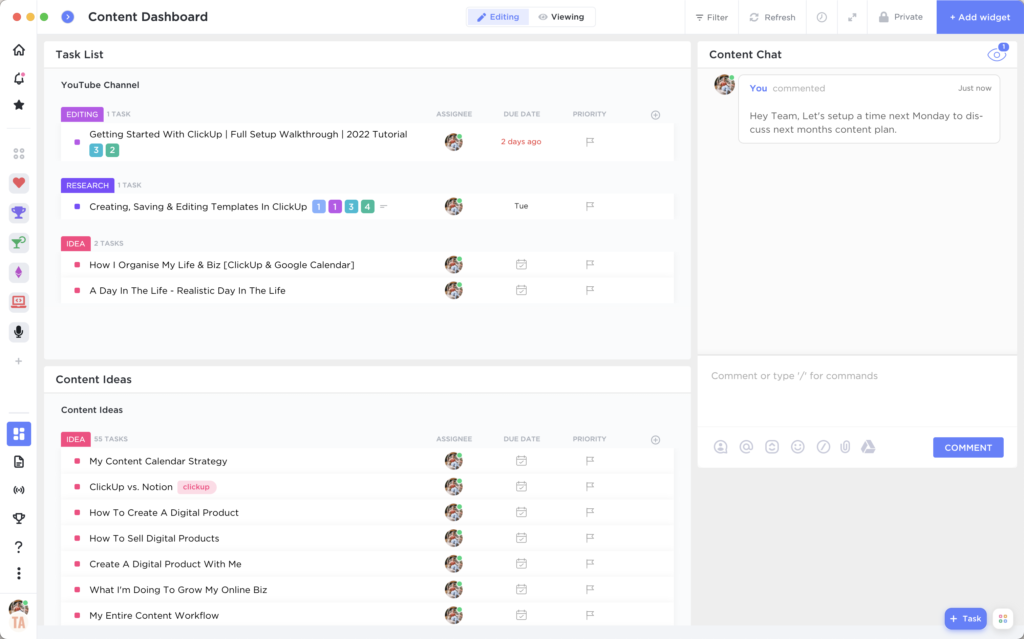
A dashboard allows you to get an overview of anything that is happening in your business. You can also create multiple dashboards so you can track multiple projects at a time.
How it works is by first creating a dashboard, and then assigning widgets to the dashboard. The widgets can be anything from task lists to workload by assignees to a custom chat specific to the topic of your dashboard.
For example, if we wanted to monitor our content creation process we could add widgets to a Content Dashboard so we can see what tasks are still outstanding, what each member of your marketing team workload looks like, a custom chat for discussing content, maybe another running list for content ideas.

Docs
ClickUp has docs built into it, so you don’t need to worry about having separate information in something like Google Docs, although you could integrate these if you’d prefer as ClickUp does give you that option on their paid plans. I much prefer the native ClickUp Docs as it keeps everything streamlined in one place.
It allows for easy linking between docs or linking to projects or tasks. It also makes building out standard operating procedures or SOPs so easy.
Templates
ClickUp has an entire template library that you can access which not only allows you to save your own custom templates but also gives you access to a community library with hundreds of public templates that you are free to use and modify to suit your needs.
You’re able to create templates for lists, tasks, checklists, and even documents. No more having a separate space for templates that you need to navigate to and then copy, paste and move to the list you need it in.
If you want to learn more about ClickUp templates then check out my tutorial on how to Create, Update & Use ClickUp Templates, where I show you how to do this for all features within ClickUp.
Settings
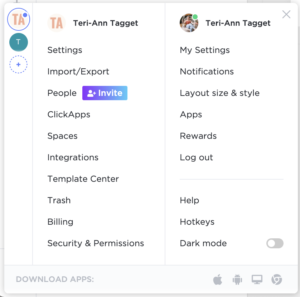
There are two types of settings within ClickUp, your profile settings and the workspace settings. In the top left-hand corner where your Workspace name is, are the settings for your currently selected Workspace and the majority of these settings are only accessible by those with Admin permissions.
If you click on your profile image in the top right-hand side corner, this is your profile settings within the workspace. Here you can customise your notification preferences as well as adjust the layout size and style of your side menu.

ClickApps
ClickApps are custom applications that you can opt into at the administrative level for each space you create.
Some of these apps require a paid plan but include things such as built-in time trackers, screen recording, collaborative editing, tags, and one of my favourites, automations.
There are plenty of options here so they are definitely work looking at when setting up your spaces.
People, Roles & Access
This is another workspace admin/owner-level setting and is where you can control permissions for each person who requires access to one or more of your workspaces or spaces.
The options are Admin, who has full access to make changes to a workspace. Members who are able to access anything within the workspaces or spaces that are assigned to them however they can’t change settings etc. And Guests which is a great user option if you want to bring a client into a project list to keep them accountable for their tasks. You can add them directly to a singular list and that’s all they’ll have access to.
I hope this helped give you a better understanding of ClickUp and some of its features. I can’t stress enough just how much this Project Management App has streamlined both my personal and business life. If you haven’t already signed up and tried ClickUp out for yourself then click the link here.
If you have any questions or any particular ClickUp features or topics you’d like me to cover, leave me a comment below.
Disclaimer: I sometimes include affiliate links within my posts for my fave products. If you click and purchase, I may receive a small commission at no extra cost to you.

0
Comments