


So you’ve decided it’s time to start building your email list, you’ve signed up for Flodesk and breezed through the easy-as-pie process of creating an opt-in form, and then you’re hit with that final step. Embedding the form in your blog.
You probably looked at those embed codes and instantly felt that wave of ‘oh crap what do I do with this?’ wash over you. But I’m here to reassure you that adding this form is no more than a few clicks and a little copy and pasting, I promise!
In this tutorial, I’m going to walk you through how to embed your Flodesk Inline Form within your Showit website as well as how to add it to individual blog posts.
If you are yet to jump on the Flodesk bandwagon it’s kind of the new kid on the block when it comes to email marketing software and I’m soooo into it.
The emphasis put on user experience is outstanding, it’s so simple and easy to use, plus the clean minimal interface just makes me so happy.
They also have a complete library of gorgeous email templates for all different email types to get you started.
Alright, there’s a bit to cover so let’s get into it..
Access Your Flodesk Inline Form Embed Codes
The first thing we are going to need to do is retrieve the embed codes we’ll need to add the form to our blog.
To do this, log in to your Flodesk account and access your forms by selecting the Forms option in the top navigation.
Find the Inline Form you want to embed in your Showit Blog, hover over it with your cursor and click the 3 dots that appear in the top right of that form.
From the drop down select ’embed’. This will take you straight to the embed codes within the form that you’ll need.
If you haven’t set up your form yet or you’re not sure how I have an entire tutorial showing you How to set up an automated workflow in Flodesk. In that tutorial, I show you how to create an inline form so go check that out if you need help getting set up.
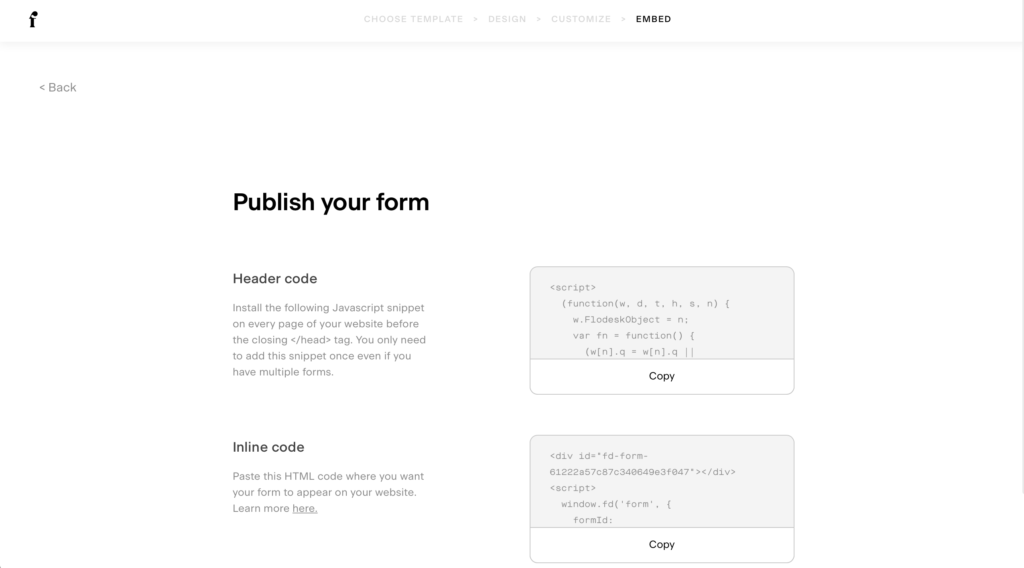
On the embed page, you’ll see two types of code, a Header Code which needs to be added to the header tag of the page you want to add your form to.
The second code is your inline code, which is the actual code snippet you’ll place on your blog in the exact spot you want your form to appear.
Adding Header Code To Showit Page
Before we can add our form we need to add the Header Code within the backend of our page. This is the underlying code that will link your Showit Blog to your Flodesk Forms.
To copy the Header Code simply click ‘Copy’ underneath the code snippet.
Now you’ll want to open up your Showit website and select the page you want to add the inline form to. For blog posts, you’ll add this to your single-post WordPress template.
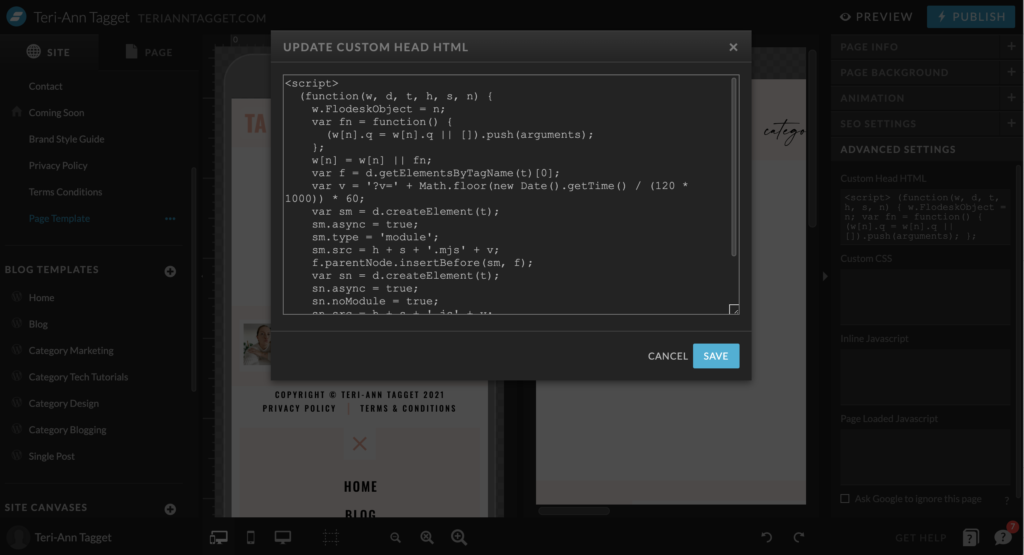
From within the page menu, on the right-hand side, at the very bottom select the Advanced Settings tab.
You now want to paste the Header Code in the very top section that says ‘Custom Head HTML’.
Once it’s pasted, click save and make sure you re-publish your website including your blog.
You’ll need to repeat this for every page on your website or blog that you want to embed your inline form.
Adding Flodesk Inline Form Code To Page
Now let’s add the actual Inline Form to our website. To do this head back to Flodesk & copy the second code on the embed page which is the Inline Code.
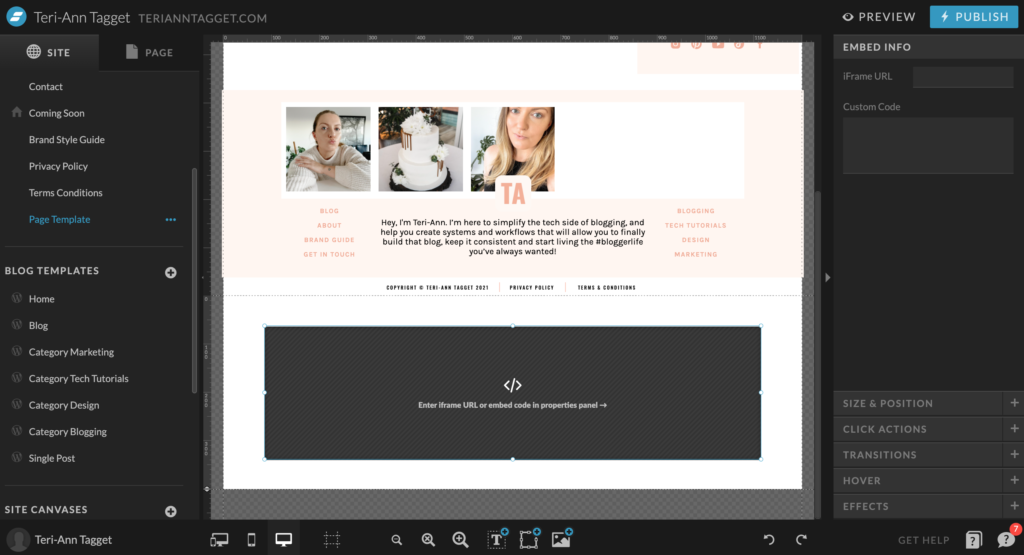
On your Showit page, navigate to the canvas that you want to add the inline form to and click ‘edit canvas’.
Add the bottom of your screen, you want to add a new element that is an ‘Embed Code’.
Once it’s added to your canvas, click on the Embed Info Tab in the right-side editing panel.
Click where it says custom code and a box will appear. You want to paste your inline code in that box and click save.
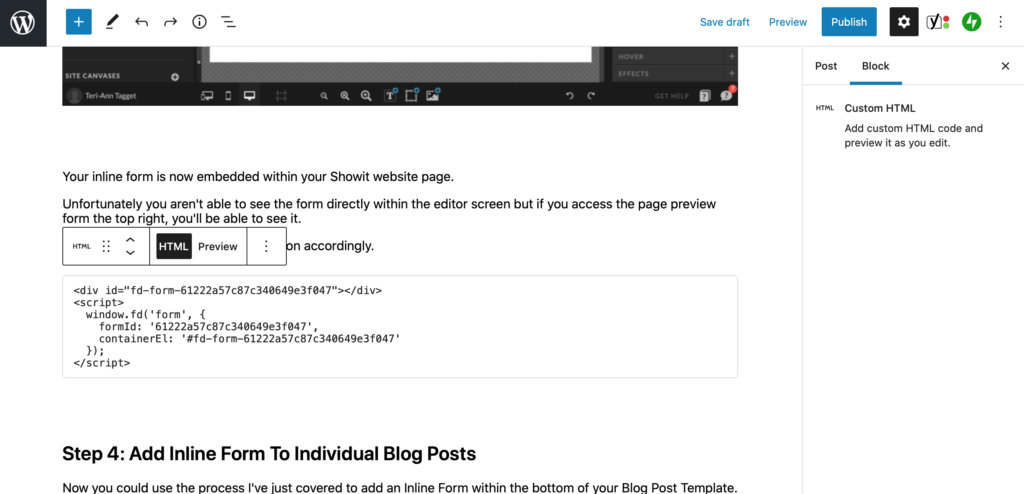
Your inline form is now embedded within your Showit website page.
Unfortunately, you aren’t able to see the form directly within the editor screen but if you access the page preview from the top right, you’ll be able to see it.
You can then adjust the size and position accordingly.
Adding a Flodesk Inline Form To Individual Blog Posts
Now you could use the process I’ve just covered to add an Inline Form within the bottom of your Blog Post Template. But what if you wanted to add a specific Inline Form to a particular post?
This is totally doable and my preferred way of including opt-ins as I like to place them where they seem most natural within the blog post which is usually towards the end but before the outro or conclusion.
Adding an Inline Code to your blog posts is absolutely possible, but works in a slightly different way because your blog post content is housed within WordPress.
So to add an inline form to your blog posts you’ll need to follow the Header Code steps I’ve already shown you, but you’ll need to add the code to the single post page within Showit and publish your site.
Then Head back to Flodesk & copy the Inline Code.
From here you want to sign into your WordPress site and open the blog post that you want to add the form to.
Find the spot within your blog post that you want to add your form and select ‘add block’.
Use the search function to find an HTML Block, and add this to your post. Then paste your inline code within the block.
Then you can either hit update, publish or schedule on your blog post.
To preview the Inline Form within your post, select ‘Preview’, then ‘Preview In A New Tab’ from the top navigation of the WordPress Post Editor.
You’ll now be able to include your most relevant opt-in freebie in all of your blog posts and have full control over the placement.
Including opt-in opportunities within your website, blog and blog posts is the best way to start growing your email list.
I hope you found this tutorial on embedding Flodesk Inline Forms helpful. Happy list building!
Disclaimer: I sometimes include affiliate links within my posts for my fave products. If you click and purchase, I may receive a small commission at no extra cost to you.


0
Comments