


Look, I make no secret of the fact that I am absolutely obsessed with Canva, it is an absolute game-changer within the design space.
If you’ve been around for a while you’ll know that I’m all about creating a cohesive, aligned brand for your blog.
Canva makes this so stinkin’ easy to do with one simple feature called the Brand Kit.
The Brand Kit can be found on the left side of your Canva Dashboard and allows you to upload your complete brand style guide, making for super easy access no matter what you are working on.
No more trying to remember your brand colour hex codes or scrolling through your uploads to find your logo.
In this post, I’m going to show you how to set up your brand kit within Canva and also how you can easily access it within the design screen.
Step 1: Upload Your Logos
Once you’ve navigated to the Brand Kit from the left side of your Canva Dashboard, it’ll look like this.
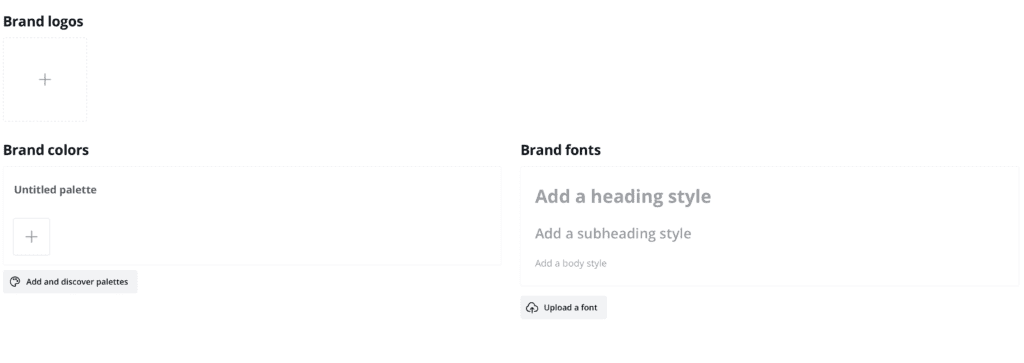
The first thing you’ll want to do is upload your logo and any variations such as submarks or icons.
To upload your logos you can either click the + symbol under Brand Logos and locate your logos within your computer. Or you can simply drag and drop the logos directly from your computer folder.
You’ll want to ensure that your logos are high resolution and in either PNG or SVG format, that way they have a transparent background and can be placed over any colour or image.
I highly recommend having multiple logo variations. You can learn more about designing logos in my How To Create A Brand Style Guide post.

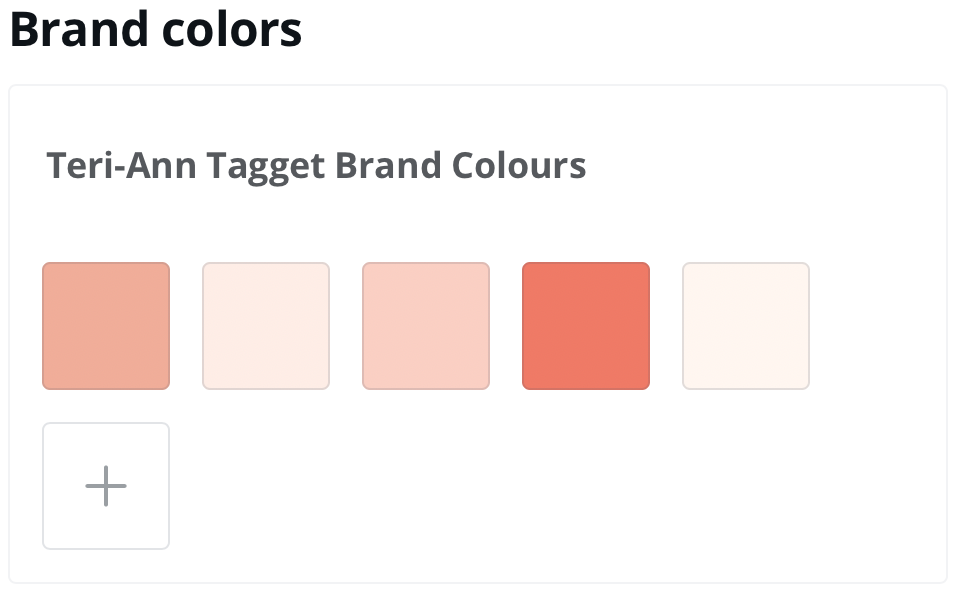
Step 2: Select Your Brand Colours
Next up, you’ll want to add your brand colours. To do this you’ll need to know the HEX codes for each colour.
Select the + under Brand Colors and enter your HEX code. Alternatively, you can select a colour from the colour wheel.
However, I would highly recommend doing your research to ensure you are selecting brand colours that will align with your brand and attract your target audience.
You can add as many colours as you’d like here with most brand palettes consisting of 5-6 colours. Again, I cover all about selecting brand colours in my post on How To Create A Brand Style Guide.
You also have the option to give your Brand Color Palette a title. Just click where it says ‘untitled palette’ and type in your chosen title.
Bonus Step: Upload Custom Fonts
I’ve put this step ahead of our third and final step of choosing brand fonts because although Canva does have an extensive library of fonts to choose from, there are some amazing designers out there making gorgeous fonts that it would be a shame not to be able to use them in your designs.
Also if you followed my recommendations in How To Create A Brand Style Guide and stuck with a safe Google Font for your brand fonts, you’ll notice that not all of them are available within Canva.
Luckily, there is an easy fix!
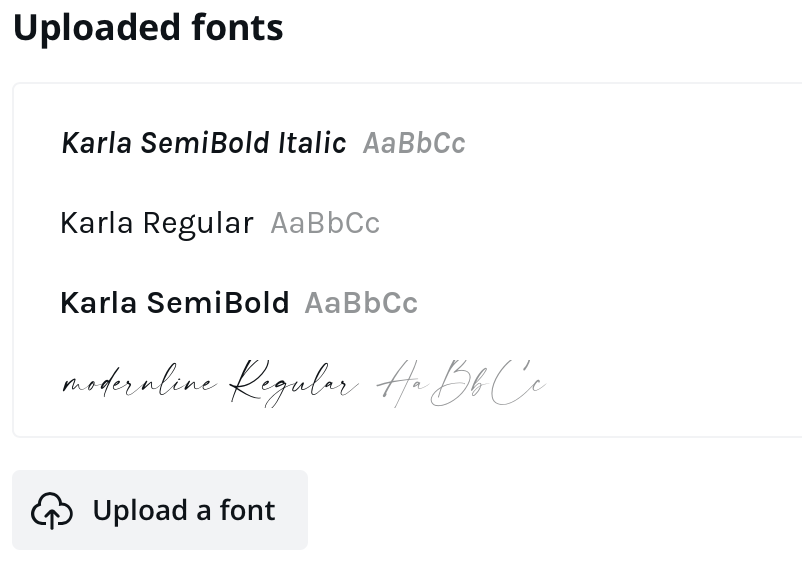
In the bottom right corner under Brand Fonts, you’ll see a section labelled Uploaded Fonts.
It’s important to note here that these are not your Brand Fonts, these are simply fonts that you’ve chosen to upload. We’ll select the brand fonts in Step 3.
The first thing you need to do is make sure that the font you want to upload is saved to your computer. If it isn’t you’ll need to download it from either Google Fonts or wherever you’ve purchased it.
Click the ‘Upload A Font’ button and navigate to the folder on your computer where the font is saved. Canva supports OTF, TTF, and WOFF font formats. Choose the file to upload, and click Open.
IMPORTANT: Only upload fonts that you have a license to use. You will be asked if you have a license/rights to use the font. Click ‘Yes, upload away!’ to confirm that you do.
Once your font is successfully uploaded it will appear within the ‘Uploaded Fonts’ section of your brand kit.
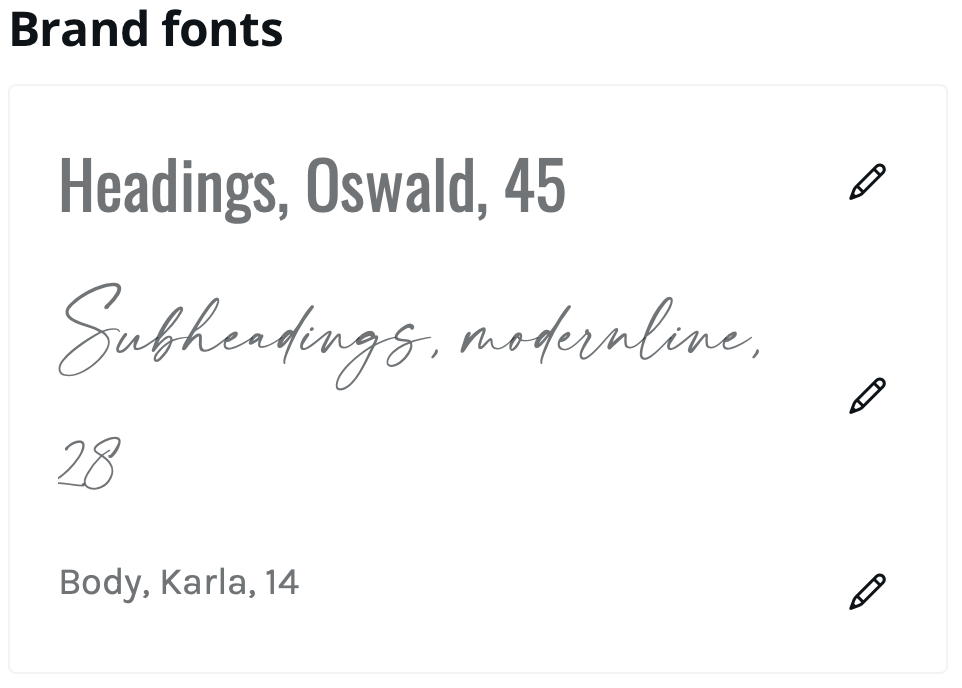
Step 3: Select Brand Fonts
The last step in putting together your Brand Kit is to select your brand fonts. Under ‘Brand Fonts’ you’ll be able to choose fonts for your heading, subheadings & body text as well as the size of each font.
As my subheading font is the same as my heading font, I prefer to use my subheading font option for my accent or script font.
To add your first brand font click on the ‘add a heading style’ text. A small window will pop up for you to select your chosen font and size.
You can either use the search bar to find your chosen font, or simply scroll down slightly and you will be able to see the list of fonts you just uploaded.
Repeat this process for both the subheading and body fonts.
Accessing Your Brand Kit
Now that you’ve uploaded everything to your Brand Kit, you’ll be able to easily access all your brand elements from within the design editor.
Logos
To access your logos navigate to the far left panel and you should see a tab titled ‘Brand’. You’ll find all of your logo variations and icons here.
Simply click the logo you want and it will be added to your design.

Colours
To change an element to one of your brand colours, select the element that you wish to change. You’ll see a small coloured square on the left side of the top editing panel appear.
Click the square and you’ll see a colour panel appear, underneath Document Colors you’ll see your brand colours, if you gave your palette a title it will appear here above your colours.
To change a font colour, similar to the element, select the font you wish to change but instead of a square, you’ll see the letter A with a coloured bar underneath.
Select this and you’ll once again see the colour panel where you can choose your brand colour.
Fonts
Once you’ve uploaded your Brand Fonts anytime you select a header, subheader or body text box it will already be your chosen font.
However, if you are designing from a template or you just want a different font, select the font you wish to change and on the left side of the top editing panel you’ll see a dropdown menu showing the current font.
Click on the drop-down menu, it will first show you the current fonts being used within the design, followed by any recent fonts used, and then under that, you will see your brand fonts.
Select the font you wish to use, then adjust the font size as needed.
And just like that, you’ve got everything right at your fingertips. No more trying to remember your brand colour hex codes or scrolling through your hundreds of uploads to find your logo.
I hope you found this helpful and if you want to really dive into creating a brand for yourself and your blog download my free Brand Style Guide Canva Template. This guide will walk you through each aspect of building a memorable and aligned brand.
Disclaimer: I sometimes include affiliate links within my posts for my fave products. If you click and purchase, I may receive a small commission at no extra cost to you.


0
Comments